Introduction
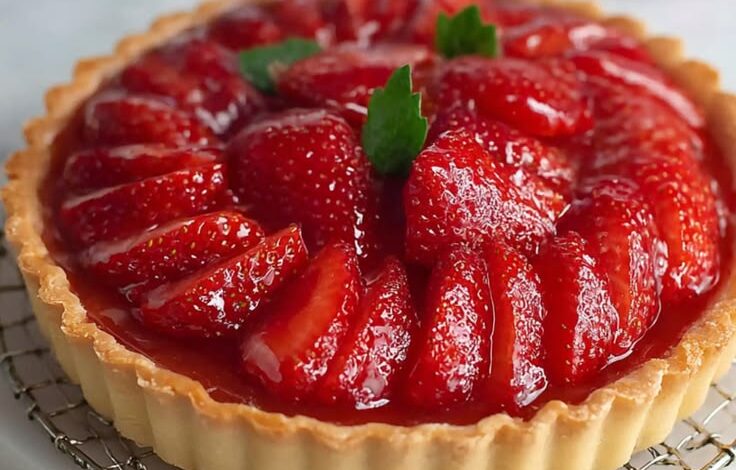
Get ready for a burst of sunshine and sweetness with our homemade Strawberry Tart! This dessert is a true celebration of fresh strawberries, nestled in a creamy vanilla filling and a buttery, crisp crust. It’s not just a treat for your taste buds; it’s a feast for your eyes, with its vibrant red berries arranged beautifully on top.
You might think making a tart is complicated, but this recipe is surprisingly simple and quick to assemble. We’ll use a straightforward press-in crust and a no-cook pastry cream, making it a perfect project for any home baker, even beginners. No fancy equipment or tricky techniques are needed to create this showstopper.
So, clear your counter, gather your ingredients, and prepare to impress yourself and your loved ones. This Homemade Strawberry Tart is pure joy in every bite, and you’re going to love making it. Let’s dive in!
Cooking Time & Prep Time
- Prep Time: 45 minutes
- Cooking Time: 20 minutes (for the crust)
- Chilling Time: 2 hours
- Total Time: 3 hours 5 minutes
Small tip: You can prepare the tart crust dough and the pastry cream a day ahead. Store them separately in the fridge, well-covered, to save time on baking day!
Ingredients
This recipe makes 8 servings.
For the Tart Crust
- 1 ½ cups (180g) all-purpose flour
- ½ cup (113g) unsalted butter, cold and cut into small cubes
- ¼ cup (50g) granulated sugar
- ¼ teaspoon salt
- 2-3 tablespoons ice water
For the Vanilla Pastry Cream
- 2 cups (480ml) whole milk
- ½ cup (100g) granulated sugar
- ¼ cup (30g) cornstarch
- 3 large egg yolks
- 2 tablespoons unsalted butter, softened
- 1 teaspoon vanilla extract
- Pinch of salt
For the Strawberry Topping
- 2 lbs (about 4 cups) fresh strawberries, hulled and sliced
- 2 tablespoons apricot jam or red currant jelly (for glaze, optional)
- 1 tablespoon hot water (for glaze, optional)
Step-by-Step Instructions
-
Step 1: Prepare the Tart Crust Dough
In a large bowl, whisk together the flour, sugar, and salt. Add the cold butter cubes. Use your fingertips or a pastry blender to cut the butter into the flour until the mixture resembles coarse crumbs with some pea-sized pieces of butter remaining.
Small tip: Work quickly to prevent the butter from getting too warm. Cold butter makes a flakier crust!
-
Step 2: Form and Bake the Tart Crust
Gradually add ice water, one tablespoon at a time, mixing until the dough just comes together. Do not overmix. Press the dough evenly into a 9-inch tart pan with a removable bottom. Prick the bottom with a fork. Bake in a preheated oven at 375°F (190°C) for 18-20 minutes, or until golden brown. Let it cool completely on a wire rack.
Small tip: For an extra crisp crust, blind bake it first by lining with parchment paper and filling with pie weights or dried beans.
-
Step 3: Make the Vanilla Pastry Cream
In a medium saucepan, whisk together milk, sugar, cornstarch, egg yolks, and a pinch of salt. Cook over medium heat, stirring constantly, until the mixture thickens and comes to a boil. Boil for 1 minute, still stirring. Remove from heat and stir in the softened butter and vanilla extract until smooth.
Small tip: Use a whisk to prevent lumps and ensure a super smooth cream.
-
Step 4: Assemble the Tart Base
Pour the warm pastry cream into the cooled tart shell. Spread it evenly using a spatula. Cover the surface of the cream directly with plastic wrap to prevent a skin from forming. Refrigerate for at least 2 hours, or until thoroughly chilled and set.
Small tip: Chilling is crucial for the cream to set properly, so don’t rush this step!
-
Step 5: Arrange the Strawberries
Once the tart is chilled, remove the plastic wrap. Arrange the sliced strawberries decoratively over the pastry cream. You can create concentric circles or any pattern you like.
Small tip: Overlap the slices slightly for a beautiful, full look.
-
Step 6: Glaze and Serve (Optional)
If desired, warm the apricot jam (or jelly) with hot water in a small saucepan or microwave until melted and smooth. Brush this glaze gently over the strawberries. This adds a beautiful shine and helps preserve the berries. Serve your gorgeous Homemade Strawberry Tart immediately or keep chilled until ready to enjoy!
Small tip: The glaze is optional but adds a lovely professional finish and a touch of sweetness.
Tips & Variations
- Gluten-Free Option: Substitute the all-purpose flour in the crust with a 1:1 gluten-free baking flour blend. You can also use a simple almond flour crust by combining 2 cups almond flour, ¼ cup sugar, and ½ cup melted butter. Press into the pan and bake.
- Vegan or Vegetarian Option: For a vegan tart, use a pre-made vegan pie crust or make one with vegan butter. For the pastry cream, use a plant-based milk (like almond or soy), replace egg yolks with an extra tablespoon of cornstarch or agar-agar, and use vegan butter.
- Add More Fruits or Nuts: While strawberries are the star, feel free to add a layer of fresh raspberries, blueberries, or sliced kiwi under or alongside the strawberries for extra flavor and color. A sprinkle of toasted slivered almonds or chopped pistachios on top can add a nice crunch and a touch of protein.
- Spicy Twist: For an unexpected kick, add a tiny pinch of freshly ground black pepper or a whisper of ground ginger to the strawberry glaze. This enhances the fruit’s natural sweetness in a unique way.
- Lemon Zest Brightness: Stir 1 teaspoon of fresh lemon zest into the pastry cream along with the vanilla extract. This adds a wonderful bright, citrusy note that complements the strawberries perfectly. You can also add a touch of lemon juice to the glaze for extra zing.
Nutritional Information
Approximate values per serving (based on 8 servings):
- Calories: 350 kcal
- Protein: 5g
- Carbohydrates: 48g
- Fat: 16g
Note: These values are approximate and may vary depending on specific ingredients and brands used.
Health Benefits
This delightful strawberry tart isn’t just delicious; it offers some health perks too, mainly thanks to its star ingredient!
Strawberries are Powerhouses: These bright red berries are packed with Vitamin C, an essential antioxidant that supports your immune system and promotes healthy skin. Just one serving can provide more than your daily recommended intake!
Rich in Antioxidants: Beyond Vitamin C, strawberries contain a variety of antioxidants like anthocyanins, which give them their vibrant red color. These compounds help fight free radicals in your body, potentially reducing inflammation and protecting cells.
Good for Heart Health: Studies suggest that the antioxidants and fiber in strawberries can contribute to heart health by helping to lower bad cholesterol and blood pressure.
Fiber for Digestion: Strawberries are also a good source of dietary fiber. Fiber is important for digestive health, helping to keep things regular and promoting a feeling of fullness.
Serving Suggestions
- Serve a slice with a dollop of freshly whipped cream or a scoop of vanilla bean ice cream for an extra indulgent treat.
- This tart is perfect as a light and refreshing dessert after any meal, from a casual weeknight dinner to a special occasion.
- Enjoy a slice with your morning coffee or afternoon tea for a delightful pick-me-up.
- It makes a stunning centerpiece for a brunch spread or a garden party dessert table.
Storage Tips
Your beautiful Homemade Strawberry Tart will keep well in the refrigerator for 3-4 days. Make sure to cover it loosely with plastic wrap or aluminum foil to prevent it from drying out or absorbing odors. Freezing the assembled tart is not recommended, as the strawberries can become mushy and the cream’s texture may change upon thawing. This tart is best enjoyed fresh and chilled, so no reheating is needed!
Conclusion
There you have it – a truly irresistible Homemade Strawberry Tart that looks as good as it tastes! With its buttery crust, smooth vanilla cream, and a mountain of fresh, juicy strawberries, it’s a dessert that brings smiles to every face. It’s elegant, yet wonderfully approachable to make, proving that homemade doesn’t have to mean complicated.
We hope you feel inspired and confident to try this recipe in your own kitchen. The simple steps and helpful tips are designed to guide you to success, resulting in a tart that tastes like it came straight from a fancy patisserie.
So go ahead, embrace the joy of baking, and create this stunning Strawberry Tart. Share it with your family, bring it to a potluck, or simply savor a slice all to yourself. Every bite is a little piece of happiness!
Helpful Cooking Tools
Homemade Strawberry Tart
Introduction Get ready for a burst of sunshine and sweetness with our homemade Strawberry Tart! This dessert is a true celebration of fresh strawberries, nestled in a creamy vanilla filling...