Introduction
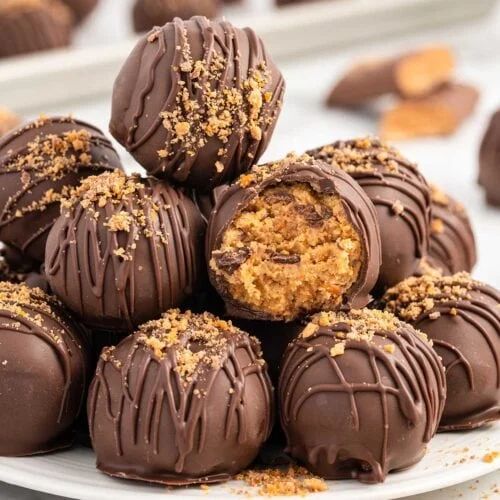
If you love sweet treats that are easy to make and full of flavor, you will love Butterfinger Balls. These little no-bake bites are creamy, crunchy, and covered in smooth chocolate. They are inspired by the classic Butterfinger candy bar, which is known for its crispy peanut butter center and rich chocolate coating.
Butterfinger Balls are perfect for holidays, parties, or simple family treats. You do not need an oven. You only need a few simple ingredients and a little time. Even beginners can make them with great results. The mix of peanut butter, crushed Butterfinger candy, and chocolate creates a dessert that tastes like it came from a bakery.
The best part? You can prepare them ahead of time and store them in the fridge or freezer. They are great for sharing, gifting, or enjoying as a quick sweet snack.
Let’s get started!
Cooking Time & Prep Time
- Prep Time: 20–25 minutes
- Chilling Time: 30–45 minutes
- Total Time: About 1 hour
- Cooking/Baking Time: None (No-bake recipe)
These treats come together quickly. Most of the time is spent chilling so they can firm up properly.
Ingredients
Here is everything you need:
- 2 cups crushed Butterfinger candy bars (about 8–10 fun-size bars)
- 1 cup creamy peanut butter
- 4 tablespoons unsalted butter, softened
- 1 ½ cups powdered sugar
- 1 teaspoon vanilla extract
- 2 cups semi-sweet chocolate chips
- 1 tablespoon coconut oil (optional, for smoother melting)
Make sure the butter is soft before you start. This helps everything mix smoothly.
Step-by-Step Instructions
Step 1: Crush the Butterfinger Candy
Unwrap the Butterfinger candy bars. Place them in a zip-top bag. Use a rolling pin or heavy spoon to crush them into small pieces.
Tip: Do not turn them into powder. Small crunchy pieces give the best texture.
Set the crushed candy aside.
Step 2: Mix the Peanut Butter Filling
In a large mixing bowl, add:
- Creamy peanut butter
- Softened butter
- Powdered sugar
- Vanilla extract
Use a hand mixer or spoon to mix everything together. Stir until smooth and creamy.
Next, fold in the crushed Butterfinger pieces. Mix until they are evenly spread through the peanut butter mixture.
The mixture should be thick and easy to shape. If it feels too soft, place it in the fridge for 10–15 minutes.
Step 3: Shape into Balls
Line a baking sheet with parchment paper.
Scoop about 1 tablespoon of the mixture. Roll it between your hands to form a smooth ball. Place it on the lined tray.
Repeat until all the mixture is used. You should get about 20–24 balls, depending on size.
Place the tray in the refrigerator for 30 minutes. This helps them firm up before dipping in chocolate.
Step 4: Melt the Chocolate
Add the chocolate chips to a microwave-safe bowl. Add coconut oil if using.
Microwave in 30-second intervals. Stir after each interval. Continue until the chocolate is fully melted and smooth.
Tip: Do not overheat the chocolate. Stirring between intervals prevents burning.
You can also melt the chocolate using a double boiler on the stove.
Step 5: Dip the Balls in Chocolate
Remove the chilled peanut butter balls from the fridge.
Using a fork, dip one ball into the melted chocolate. Roll it around to coat completely. Lift it out and gently tap the fork on the side of the bowl to remove extra chocolate.
Place the coated ball back on the parchment paper.
Repeat with the remaining balls.
If you like, drizzle extra melted chocolate on top for decoration.
Step 6: Chill Again
Place the tray back in the refrigerator for 20–30 minutes, or until the chocolate is firm.
Once set, your Butterfinger Balls are ready to enjoy!
Tips & Variations
Butterfinger Balls are easy to customize. Here are some helpful ideas:
Make Them Extra Crunchy
Add 2–3 tablespoons of crushed cornflakes or crispy rice cereal to the filling. This gives even more crunch.
Use Dark Chocolate
Swap semi-sweet chocolate for dark chocolate if you prefer a richer taste.
White Chocolate Version
Dip the balls in melted white chocolate for a sweeter flavor and lighter look.
Make Them Vegan
- Use dairy-free chocolate chips.
- Use plant-based butter.
- Make sure your candy is dairy-free.
Make Them Gluten-Free
Most peanut butter and chocolate chips are gluten-free. Always check labels. Some candy bars may contain gluten, so choose a certified gluten-free option if needed.
Lower Sugar Option
Use natural peanut butter with no added sugar. You can also reduce powdered sugar slightly, but the texture may change.
Add Sea Salt
Sprinkle a tiny pinch of sea salt on top before the chocolate sets. This balances the sweetness beautifully.
Small changes can make a big difference. Feel free to experiment!
Nutritional Information
Here is the approximate nutrition per serving (1 ball, based on 22 balls total):
- Calories: 180–200
- Protein: 3–4 grams
- Carbohydrates: 18–20 grams
- Fat: 11–13 grams
- Sugar: 15 grams
Keep in mind these numbers are estimates. They may change depending on the brands you use and the size of each ball.
These are sweet treats, so enjoy them in moderation.
Health Benefits
Butterfinger Balls are a dessert, but they still have some ingredients that offer benefits.
Peanut Butter
Peanut butter contains protein and healthy fats. Protein helps build and repair muscles. Healthy fats help keep you full longer.
It also contains vitamins like Vitamin E and minerals like magnesium.
Dark Chocolate (if used)
Dark chocolate contains antioxidants. These help protect your body from damage caused by free radicals.
Portion Control
Because these treats are small, it is easier to control portion size. One or two balls can satisfy your sweet craving.
While this is not a “health food,” using good-quality ingredients and enjoying small portions makes it a fun treat that fits into a balanced diet.
Serving Suggestions
Butterfinger Balls are perfect for many occasions.
For Parties
Arrange them on a dessert tray with cookies and brownies. They look beautiful with a drizzle of chocolate on top.
For Holidays
Place them in mini paper cups. Store in a decorative tin and give as homemade gifts.
With Drinks
Serve with:
- Hot coffee
- Milk
- Hot chocolate
The creamy peanut butter and chocolate taste amazing with warm drinks.
Storage Tips
- Store in an airtight container in the refrigerator for up to 1 week.
- Freeze for up to 2 months.
- If frozen, let them sit at room temperature for 5–10 minutes before eating.
Keeping them chilled helps the chocolate stay firm.
Conclusion
Butterfinger Balls are simple, sweet, and full of flavor. They require no baking and only a few ingredients. The creamy peanut butter center mixed with crunchy candy and covered in smooth chocolate makes every bite delicious.
This recipe is great for beginners. It is also fun to make with kids or friends. You can change the flavors, adjust the sweetness, or decorate them in your own style.
If you are looking for an easy dessert that everyone will love, give Butterfinger Balls a try. Make a batch for your family, share them at a party, or surprise someone with a homemade treat.
Once you taste them, they may become one of your favorite no-bake desserts!

Helpful Cooking Tools
Butterfinger Balls
Introduction If you love sweet treats that are easy to make and full of flavor, you will love Butterfinger Balls. These little no-bake bites are creamy, crunchy, and covered in...